frp内网穿透实现nomachine相互访问
系统:ubuntu 20.10,windows 10专业版 2004 19041.450
frp版本:0.33.0
服务器:阿里云ubuntu 16.04
nomachine:7.4.1(linux),6.13.1(windows)
需求
教研室一台linux,寝室一台Windows,教研室电脑具有公网ip,寝室的网是内网。需要通过 nomachine 实现远程相互连接。由于教研室的主机(linx)有公网ip,Windows 端通过 nomachine 可以直接连接到 linux 的,反过来就不行。如果需要用公网 ip 访问内网的电脑,可以通过 frp 内网穿透的方法,前提是要有一台具有公网 ip 的服务器,做来转发流量。
2022-1-7更新,既然教研室与公网的ip,那就把教研室的当成服务器,直接在教研室电脑搭建 frp 服务,这样就不在阿里云的服务器上搭建了,毕竟阿里云服务器的带宽太小了
服务器端
登陆到服务器后,下载软件(截至目前2021-4-2,frp最新版本为0.36.2,地址为https://github.com/fatedier/frp/releases/download/v0.36.2/frp_0.36.2_linux_arm64.tar.gz)
wget https://github.com/fatedier/frp/releases/download/v0.33.0/frp_0.33.0_linux_amd64.tar.gz解压文件并进入到文件夹
tar -zxvf frp_0.33.0_linux_amd64.tar.gz && cd frp_0.33.0_linux_amd64然后编辑 frps.ini (s:server)文件,里面的内容如下,更详细的配置可以参考网站,或者参考解压出来的文件frps_full.ini
# frp监听的端口,默认是7000,可以改成其他的
bind_port = 7000
# 授权码,请改成更复杂的
token = slghkhi

# frp管理后台端口,请按自己需求更改
dashboard_port = 4433
# frp管理后台用户名和密码,请改成自己的
dashboard_user = chao
dashboard_pwd = clsghsgl
enable_prometheus = true

# frp日志配置
log_file = /var/log/frps.log
log_level = info
log_max_days = 3
设置 frp 启动,解压出来有个systemd文件夹,里面有个frps.service文件,内容如下
[Unit]
Description=Frp Server Service
After=network.target

[Service]
Type=simple
User=nobody
Restart=on-failure
RestartSec=5s
ExecStart=/usr/bin/frps -c /etc/frp/frps.ini

[Install]
WantedBy=multi-user.target
我们需要将 frps 可执行文件和 frps.ini 配置文件分别复制到 /usr/bin/ 和 /etc/frp/ 中,默认是没有 /etc/frp/ 文件夹的,因此我们需要自己建立,下列操作都是使用管理员权限操作的
mkdir -p /etc/frp
cp frps.ini /etc/frp
cp frps /usr/bin
cp systemd/frps.service /lib/systemd/system/
/lib/systemd/system/ 是可以存放 systemd 的配置文件,不同发行版本可能存在差异。然后就可以启用 frp 服务了。
systemctl enable frps
systemctl start frps
可以用 systemctl status frps 查看启动是否成功。对于阿里云的服务器,还需要在设置中打开相关端口才行,不然会被拦截,在这里找到防火墙,添加相关端口,如下图,不同发行版可以还需要在系统中开放相关端口

客户端
windows
在github上下载windows平台的软件,解压后打开 frpc.ini (c:client)文件,修改里面的内容如下
[common]
server_addr = x.xx.xx.xx
server_port = 7000
token = slghkhi
[nomachine]
type = tcp
local_ip = 127.0.0.1
local_port = 4000
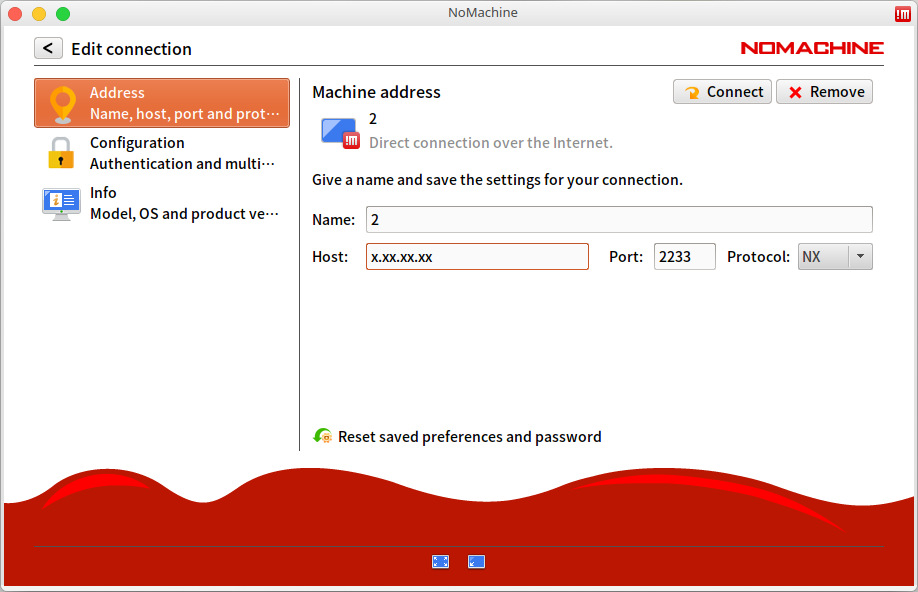
remote_port = 2233其中 server_addr 是服务器的 ip 地址,可以通过 ifconfig 查看,不过阿里云分配了两个地址,公网的地址这样是看不到的。在服务器信息处可以看到公网 ip 。server_port 和 token 需要和上面的配置文件保持一致,local_port 是本地软件软件使用的端口,比如 nomachine 默认使用的 4000 端口,而 remote_port 是服务器的端口,可自己设置。当访问服务器 2233 端口时就相当于访问本地电脑的 4000 端口,这样就可以使用 nomachine 访问内网的机器。Linux 端 nomachine 设置如下
然后启动 frp 即可,window + r 键打开 cmd 窗口,进入到解压后的目录( cd x:/文件所在目录),然后执行
frpc.exe -c frpc.ini当然,不加 -c frpc.ini 也是可以的,输入 frpc.exe 会默认读取 frpc.ini 配置文件,如果如下图所示,表示连接到服务器成功

或者直接输入x.xx.xx.xx:7000也可以参看时候连接成功,如下图所示
直接双击 frpc.exe 是无法执行的,会出现下面的情况

我们可以新建一个 bat 文件:鼠标右键–新建txt文件–修改文件名为 cmd.bat,然后用记事本打开,里面内容就输入 frpc.exe 即可,双击便可执行。当然,我们也可以将该文件加入到开机自启动,创建 cmd.bat 的快捷方式,然后移动 C:\Users\用户名\AppData\Roaming\Microsoft\Windows\Start Menu\Programs\Startup 目录即可。
linux
linux下的软件在最开始已经下载,解压后只需要更改 frpc.ini 即可,里面内容如下
[common]
server_addr = x.xx.xx.xx
server_port = 7000
token = slghkhi

[nomachine_linux]
type = tcp
local_ip = 127.0.0.1
local_port = 4011
remote_port = 2234
nomachine_linux 字段不能与 windows 下的重复,4411 是由于我更改了 nomachine 的使用端口,2234 为服务器上的端口,同样需要在服务器上开放 2234 端口。输入x.xx.xx.xx:7000 查看,已经有两台连接上了
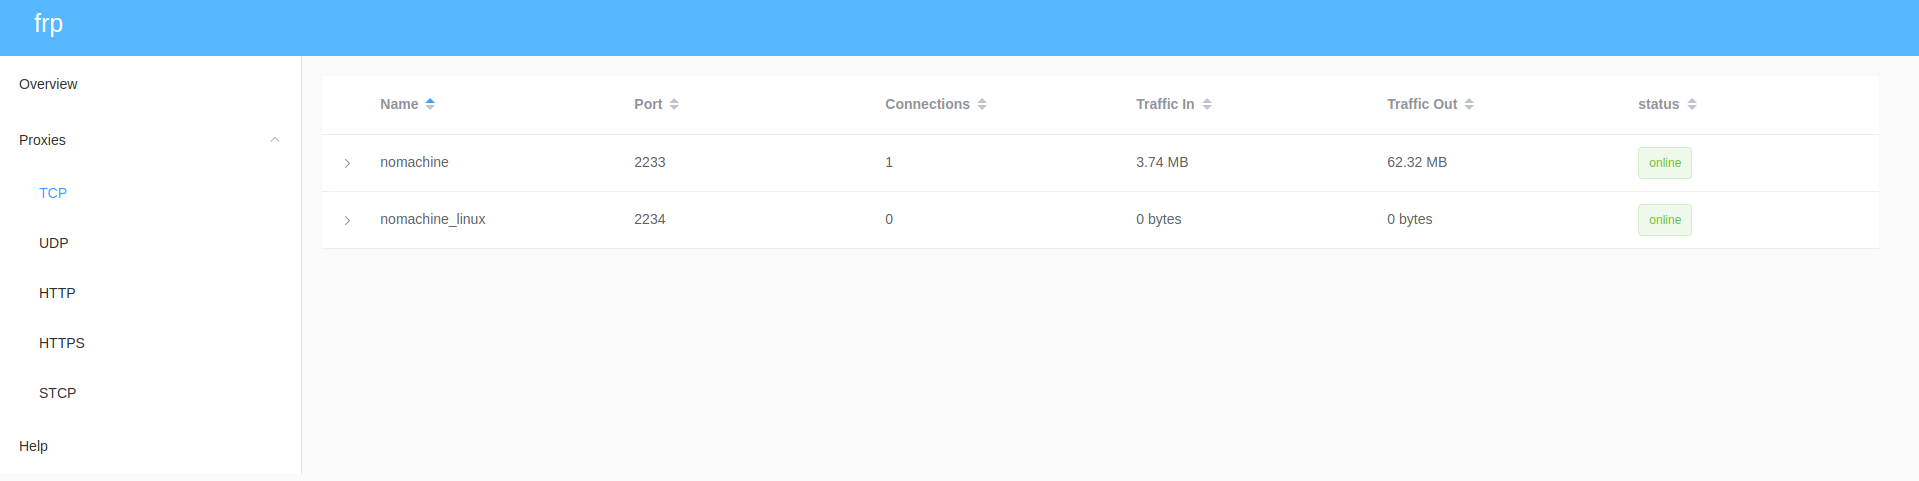
这样,通过访问服务器 x.xx.xx.xx:2234 就相当于访问本地的 4011 端口。公网 ip 的 linux 访问内网 windows 成功

同样,内网ip的 windwos 通过 x.xx.xx.xx:2234 的方式访问 linux 也是成功的

如果在这个过程中遇到了其它问题,欢迎在评论区留言,或者Google一下,也欢迎把具体的解决方法留在评论区,以供后来者参考
参考
对大佬仰望
@匿名 相互交流,学习
This is my first time pay a quick visit at here and i am really happy to read everthing at one place
I am truly thankful to the owner of this web site who has shared this fantastic piece of writing at at this place.
This is my first time pay a quick visit at here and i am really happy to read everthing at one place
Awesome! Its genuinely remarkable post, I have got much clear idea regarding from this post